Garden Journaling
I've read a thousand times about the benefits of journaling. Expressing your thoughts, venting your frustrations, sharing your inner worries and concerns, acknowledging your blessings – none of which I've done. But a garden journal. That's a different thing entirely.
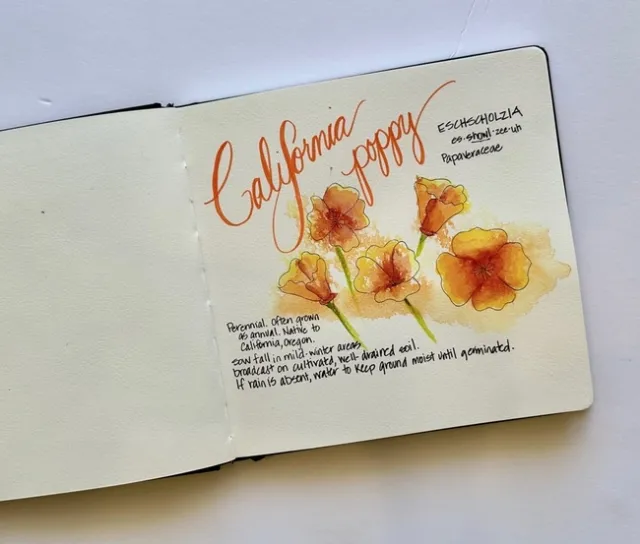
In an effort to expand my plant knowledge, or its retention, I've begun journaling. By recording its habits, needs, details about where I acquired it, when and where it is planted, pruning needs, fertilizing, etc. I am able to have a resource to refer to and am finding I'm retaining the information better. In most cases, I'm incorporating a sketch or drawing to help cement the information in my brain. So far, I'm really enjoying this new gardening tool.
Perhaps you are interested in garden journaling too. If so, follow along. We'll start easy and draw one of my favorite flowers, the California Poppy.
Remember, this isn't about creating art. It's simply implying enough information to get the sense of the object for the purpose of being able to remember the information.
Don'toverthink it – this should be fun not a chore.
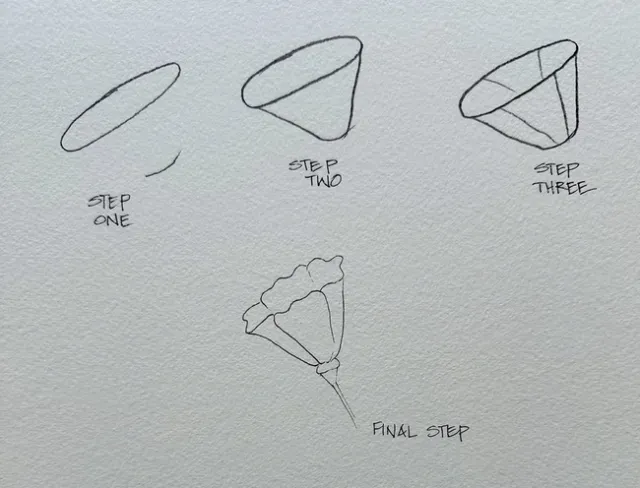
Step 1: Using a pencil and a light touch, draw an oval – or flatten circle. Add a base.
Step 2: Connect base to the top making it a squished sort of cylinder.
Step 3: Note where the petals might be. There are four petals on a poppy.
Final Step:
Now it's time to transform it from a rigid illustration into something that looks like it grows. Using a waterproof pen (I used a Micron01) use your penciled lines as general shapes but don't trace. Realizing that in nature flowers are not symmetrical and poppies are not completely smooth, draw the petals freehand. Then erase the pencil lines and add the base and stem.
Want to add color? Depending upon what medium you are using, this process will vary. For my garden journal, I normally use watercolor. I love the ‘wet in wet' look. It's more organic.
I selected three colors. Yellow and red and green. By mixing I recreated yellow, orange, red, yellow-green, green and dark green. Note the colors will vary on the screen depending upon your monitor. Again, I'm not trying to create a botanical sketch. I'm just applying some local color to note the color of the flower.
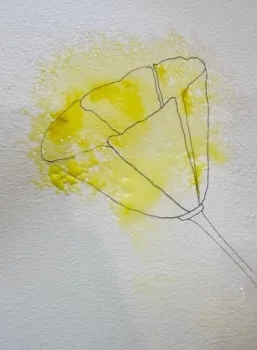
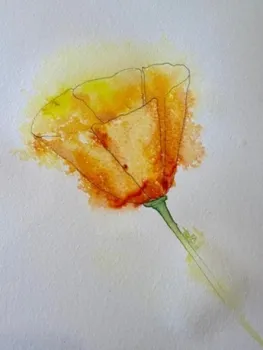
I started by spraying the paper with a little water. Then using the lighter color, yellow, I laid in a little color. Gradually adding more to create a little form and bolder hues.
Your turn. Go get a sketchbook, I really recommend one with high-quality thick paper 100# or more. I like 120# or 140#. Buy a watercolor palette, venture out in the garden, find a flower or leaf, and play.
Want to learn more about garden sketching? Comment below so we know and tell us what you would like to learn to sketch.
Now you are ready to experiment and try different shapes and angles using the basics you just completed.
Here's a few I drew and painted just to give you some additional ideas.
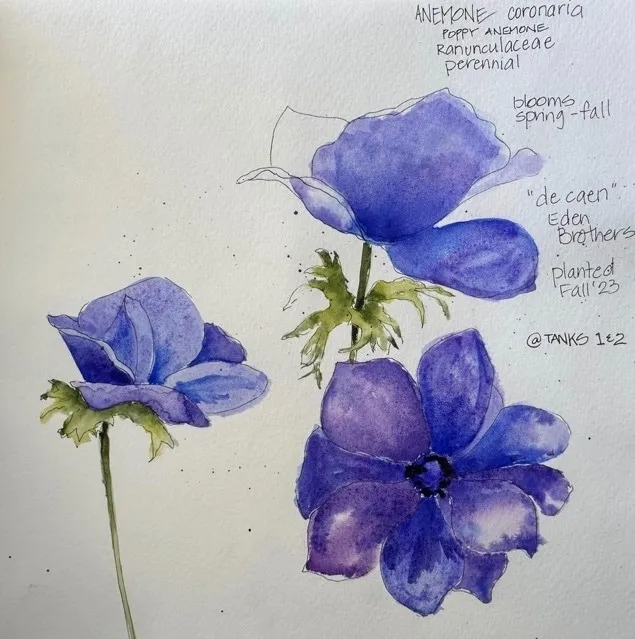
Here is another sample of a sketch in my journal showing an anemone and the type of notes I would typically make.