
by Melody Kendall
I have been intrigued by meditation labyrinths for years and when we recently redid our backyard landscape, I was determined to include one in our design. First, I had to decide on what size and shape I wanted. Researching my options was confusing as there are so many patterns and sizes available. Finally, my husband suggested that I draw out a plan for the entire landscape redo and see what size and shape labyrinth would fit best in the new landscape plans.
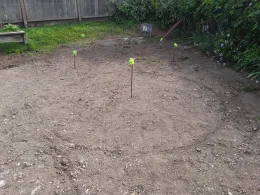
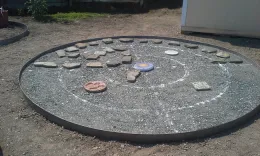
The pattern I chose was my interpretation of the classic Chartres Labyrinth which is circular in shape with a path that bends back on itself multiple times, eventually reaching the center. The labyrinth area in the design plan called for a twelve foot diameter circle. To do that I pounded a stake in the center of the labyrinth area and loosely tied a six foot length of string to the stake (picture 1). Using a pointed stick tied to the other end of the string, I used the stake and the string as a compass to draw a circle, keeping the string taut while walking around the stake in a circle. Then I stood back and looked at the circle scratched in the soil. I redid this process three or four times until the location of the circle fit perfectly in the landscape.
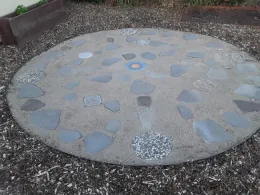
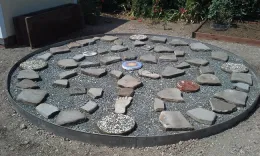
The stones for the final design of the paths were laid directly on the blue rock. We used various surplus stepping stones we had on hand and some art projects from our grandkids to create the meandering path to the center (picture 6). This was quite the process as just when we thought we had it, we realized that the way the stones were laid out the path would not reach the center, or that they were too close together so the path was confusing. Naturally we chose the hottest day of the year to do this. I can say without exaggeration that tempers certainly weren't conducive to meditation at this point, but a concise and clear path was finally created.
I could hardly wait for the area to dry to try out our new meditation labyrinth. A fellow MG asked what size the labyrinth was, I told her that it was twelve feet in diameter, but that I thought maybe I should have made it larger – when I completed the circuit I was dizzy. Another MG pointed out that the point of the meditation labyrinth was to take it slow and I might try decelerating and being mindful of the process rather than making it a race.
Who knew that this crazy world situation would happen and that, as luck would have it, I would have the perfect vehicle to shed the stress and conflict right in my backyard?
Information links:
The Labyrinth Society https://labyrinthsociety.org/make-a-labyrinth
Veriditas.org https://www.veriditas.org/
Master Gardeners are following recommended social distancing guidelines that keep everyone safe, Napa Master Gardeners are available to answer garden questions by email: mastergardeners@countyofnapa.org. or phone at 707-253-4143. Volunteers will get back to you after they research answers to your questions.
Visit our website: napamg.ucanr.edu to find answers to all of your horticultural questions.
Photo credits: Mel Kendall